The <input /> element is used to create a text fields, radio button, check box, submit button, reset button or file upload within the form element.
The <input type="text" /> element creates a one line text fields in which information like name and address are entered.
The <input type="password" /> element creates a one line password text field in which characters entered are placed by asterisks (*) or solid dots. This type of input element offers slight security and privacy when a user is logging into a system in which it prevents someone else to peek at the secrete password.
The <input type="checkbox" /> element creates a small square filled with a check mark. This type of input element is used when you want your user to have several options to choose.
The ,input type="radio" /> element creates a small rounded filled with a dot. Unlike the check box, a user can only select one option in a set. In order to have a set of radio buttons, each element should have the same value of the name attribute.
The <input type="file" /> element provides the ability to have a control that can upload a file. It looks like a text field but has a "browse" button beside it.
The <input type="submit" /> element creates a button that will submit all the information of the form.
The <input type="reset" /> element creates a button that will reset all the form controls into its initial values.
The <input type="button" /> element creates an ordinary button that has no default function. This type of input element is used client-side script like Javascript to trigger events.
The <input type="image" /> element acts like a submit button but allows to substitute the standard button with an image.
The <input type="hidden" /> element creates a control that holds data that cannot be seen or viewed by users.
Listed below are the most common attributes you can use for the input element:
- checked - sets the states of the check box to be checked.
- class - provides the class or classes of the heading. This attribute is used to identify the name of the style class or classes to be used for rendering.
- disabled - sets the state of the input element to be disabled in which it cannot be selected or controlled.
- height - sets the height in pixels (px) of the input element.
- id - provides a unique name for the input element.
- maxlength - sets the number of characters a text field can hold.
- name - provides a name for the input element.
- readonly - sets the state of the text field to be readonly.
- size - sets the size in pixels (px) of the text field.
- src - provides the Uniform resource Locator (URL) of the graphics file of the image input element.
- style - provides a cascading style sheet (CSS) properties to the input element.
- tabindex - sets the position of the tabbing order of the input element.
- title - privides a text title for the heading. Most web browser displays the value of the title as "tooltip".
- type - provides the type of control the input element will create.
- value - provides the input element value. For text fields, check boxes & radio buttons, it provides the initial value. For submit buttons, reset buttons & generic buttons, it provides the name that is displayed at the center of the button.
- width - sets the width in pixels (px) of the input element.
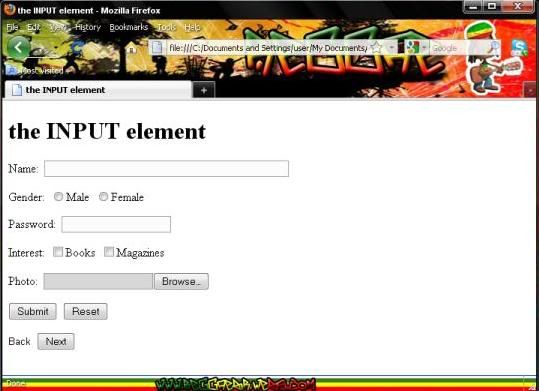
Here's an example on how to use the input element:
<!DOCTYPE html PUBLIC "-//W3C//DTD XHTML 1.0 Transitional//EN"
"http://www.w3.org/TR/xhtml1/DTD/xhtml1-transitional.dtd">
<html xmlns="http://www.w3.org/1999/xhtml">
<head>
<meta http-equiv="Content-Type" content="text/html;
charset=utf-8" />
<mate name="keywords" content="blog, web development" />
<title>the INPUT element</title>
</head>
<body>
<h1>
the INPUT element
</h1>
<form action="registration.php" method="post" id="frmRegistration" name="frmRegistration" enctype="multipart/form-data">
<p>
<label>Name:</label>
<input type="text" name="txtName" id="txtName" value="" maxlength="20" size="50" />
</p>
<p>
<label>Gender:</label>
<input type="radio" name="rbGender" id="rbmale" value="male" /><label>Male</label>
<input type="radio" name="rbGender" id="rbFemale" value="female" /><label>Female</label>
</p>
<p>
<label>Password:</label>
<input type="password" name="txtPassword" id="txtPassword" value="" maxlength="15" />
</p>
<p>
<labels>Interest:</label>
<input type="checkbox" name="cbInterest1" id="cbInterest1" value="Books" /><label>Books<label>
<input type="checkbox" name="cbInterest2" id="cbInterest2" value="Magazines" /><label>Magazines<label>
</p>
<p>
<label>Photo:</label>
<input type="file" name="txtFile" id="txtFile" value="" />
</p>
<input type="submit" name="submit" id="submit" value="Submit" />
<input type="reset" name="btnReset" id="btnReset" value="Reset" />
<p>
<input type="image" name="btnBack" id="btnBack" value="" src="back_m.png" alt="Back" />
<input type="button" name="btnNext" id="btnNext" value="Next" />
</p>
<input type="hidden" name="hdData" id="hdData" value="Registration" />
</form>
</body>
</html>


0 comments:
Post a Comment